WAR. What is it good for?
Web applications developed using Java are typically packaged and deployed using a WAR file. But what is WAR? And what is it good for? Well, WAR stands for “Web application ARchive”, and it’s a kind of Java zip file containing compiled Java libraries and any other resources required by the application. WAR files can be deployed to servlet containers (or application servers) such as Apache Tomcat, which is by far the most popular Java application server and is therefore the focus of this article.
This article presents some different ways that deployment of WAR files to a remote Tomcat server can be achieved, outlines some of the benefits and drawbacks of each method, and gives some guidance on remote debugging.
Direct (File System) Deployment of WAR Files to Tomcat
If you are developing a Java web application and you have remote access to the server where Tomcat is hosted, you can directly deploy your compiled WAR to the Tomcat server’s file system. Tomcat will automatically detect a new WAR file placed in the Tomcat webapps directory will then extract and deploy the web application contained within the WAR file.
This approach can be very beneficial in smaller projects, where there is also a small team working on the project. This is mainly because it is not difficult to do when there is one or only a few things to be deployed. In this case, the time spent in setting up automation on a short or small project might not outweigh the benefits that come from said automation.
This method is generally not encouraged though as most projects will require multiple deployments. Manually completing deployments in this manner will waste a lot of time over the lifetime of a project.
Tomcat auto-deploy issues
Tomcat will usually, by default, start to extract WAR files and deploy web applications as soon as they are moved into the Tomcat webapps directory. However, if your Tomcat instance does not auto-deploy your projects, you should set autoDeploy=”true” in the Tomcat server.xml file in the conf directory of the installation.
After this has been set, deployment can be achieved by simply moving a WAR file into the remote Tomcat webapps directory via some file transfer means (FTP, SCP etc.).
Alternatively, it is possible to stop Tomcat and manually unpack the JAR file and then restart Tomcat. This approach lends itself to being executed by a shell script and can be automated if using tools such as Ansible. We have found this to be slightly quicker than relying on Tomcat to do this.
Tomcat Web Application Manager
Tomcat has a useful Web Application Manager that allows you to upload a WAR file through a browser interface, which will then automatically be deployed.
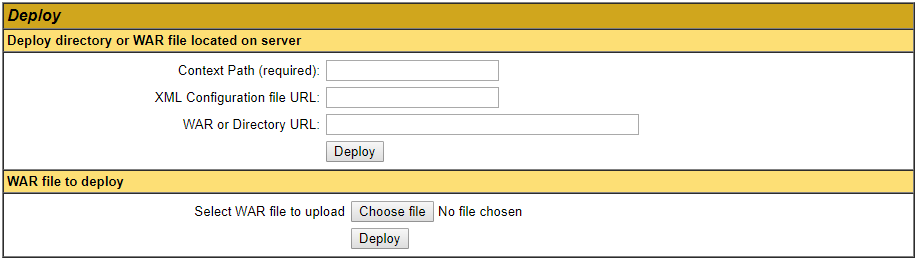
Uploading a compiled WAR file here will have the same effect as manually deploying the WAR to the webapps directory.
This method can be very useful if you do not have credentials for remote administration access to the machine that Tomcat is running on, or if the machine that you are using does not have the necessary remote admin tools installed.
Though this method can indeed be useful, it can also be exploited as a potential attack vector. As such, it is recommended that if you are going to use this, try and limit its use to the early phases of the project, ensure that you use strong credentials, and ensure that the Web Application Manager is accessible over the public internet.
Deployment via URL
The Tomcat Web Application Manager also has an URL based mechanism for deploying web apps. It is possible to deploy via URL as follows:
http://server:8080/manager/text/deploy?path=/&war=file:/path/to/warThe above command will deploy a WAR file (that must be accessible on the server) to the ROOT context in Tomcat. This feature allows third-party plugins to automate the deployment process, such as the Maven Tomcat plugin that we describe below.
If you can’t access the Web Application Manager
It can be that the Web Application Manager is not always accessible by default. This is because users and corresponding roles are normally required to access the Web Application Manager and these aren’t always set by default. Users are normally set up in the tomcat-users.xml file, adding them should allow access for example:
<tomcat-users
  xlmns="http://tomcat.apache.org/xml"
  xmlns:xsi="http://www.w3.org/2001/XMLSchema-instance"
  xsi:schemaLocation="http://tomcat.apache.org/xml tomcat-users.xsd">
  <role rolename="manager-gui">
  <role rolename="manager-script">
  <user username="tomcat" password="tomcat" roles="manager.gui,manager-script">
</tomcat-users>
If you find that you still cannot access the web manager after making this change you might require further configuration. This is because Tomcat will often limit access to the Web Application Manager based on the host accessing it.
To fix this you will need to edit the context.xml file of the manager, typically found at:
/{tomcatInstall}/webapps/manager/META-INF/context.xmlYou may also need to edit the host manager depending on your configuration:
/{tomcatInstall}/webapps/host-manager/META-INF/context.xml<Context antiResourceLocking="false" privileged="true"> <Valve className="org.apache.catalina.valves.RemoteAddrValve" allow="^.*$"> </Context>
Maven Tomcat Plugin
If you are using Maven as your build tool, you have chosen a good tool. Maven projects can utilise a nifty maven plugin to automate WAR deployments to Tomcat. Assuming that you have set up the Web Application Manager used in the prior section you should be able to use this plugin technique.
In the pom.xml of your Maven project, add a plugin with the groupId of org.apache.tomcat.maven and the artifactId of tomcat7-maven-plugin. The current version at the time of writing is 2.2. Then add another configuration XML block. This is the block that will contain the details of the FQDN or IP of the Tomcat server and any credentials that are required to log in to it:
<plugin>
  <groupId>org.apache.tomcat.maven</groupId>
  <artifactId>tomcat7-maven-plugin</artifactId>
  <version>2.2</version>
  <configuration>
    <url>http://${ip}:8080/manager/text</url>
    <path>${warpath}</path>
    <username>${user}</username>
    <password>${password}</password>
  </configuration>
</plugin>
In this scenario, parameters are passed when running the Maven command to invoke the manager. This can be done by issuing the following Maven commands:
mvn clean installFollowed by:
mvn tomcat7:deployor:
mvn tomcat7:redeployif you are re-deploying.
In the above example the “–D” switch is used to define system properties referenced in the XML. This switch is followed by the parameter of choice. This step is not necessary if you have not parameterised these credentials and they are stored in the pom.xml file.
Generally speaking, it is advisable to avoid storing credentials in the pom.xml file, since it is not good security practice to store passwords in plain text. Additionally, if you are committing this file to some kind of version control (git, svn, hg, etc.) you don’t really want to have credentials stored there either, as this tool is not ideal for the same reason but amplified.
After a mvn clean install you can deploy or re-deploy – in this scenario we are re-deploying an existing application:
mvn tomcat7:redeployIf you have set up the configuration correctly, this should result in:
[INFO] <<< tomcat7-maven-plugin:2.2:redeploy (default-cli) < package @ webapp <<<
[INFO]
[INFO]
[INFO] --- tomcat7-maven-plugin:2.2:redeploy (default-cli) @ webapp ---
[INFO] Deploying war to http://server:8080/webapp
       Uploading: http://server:8080/manager/text/deploy?path=%2Fwebapp&update=true
       Uploaded: http://server:8080/manager/text/deploy?path=%2Fwebapp&update=true (124535 KB at 4660.2 KB/sec)
[INFO] tomcatManager status code:200, ReasonPhrase:OK
[INFO] ------------------------------------------------------------------------
[INFO] BUILD SUCCESS
[INFO] ------------------------------------------------------------------------
[INFO] Total time: 01:27 min
[INFO] Finished at: 2019-04-26T09:57:41+01:00
[INFO] ------------------------------------------------------------------------
If the build is successful, it means that the web application has been deployed.
Comparison of Deployment Methods
Below is a table comparing the benefits of each approach (ratings from 1 (bad) to 5 (great)):
| Ease of set up | Ease of automation | Notes: | |
| Manual WAR deployment |
5 |
1 |
Only suitable for small apps that will developed for a short period. |
| Tomcat Web Manager (GUI) |
4 |
1 |
Useful, but not the best, also potential security risk if not handled properly. |
| Maven Tomcat plugin |
3 |
4 |
Best option, easy to automate, though credential storage should be carefully considered. |
This articles has touched on a fair few methods of deploying WAR files to Tomcat. At Priocept, we use the Maven plugin as our default build tool for enterprise Java development. It is easy to use, automation-friendly, and lends itself well to most Java projects.
Hot Swapping
Building and deploying an application can be a slow process, especially on larger projects. If you make a small code change, you would like to see the effect of the change instantly (like you do when doing UI development with JavaScript or similar).
Hot Swapping is a feature of the JVM that allows reloading classes directly on the server. Rather than having to recompile and redeploy the complete application, you can make changes to a class and deploy only that one file, without even having to restart the application.
There are various tools for achieving this in Java. JRebel is a commonly used paid tool that works with Eclipse and IntelliJ.
Alternatively, Hot Swap Agent is free plugin for IntelliJ. To use this is pretty easy to setup. First, install DCEVM:
Then follow the instructions on this page:
Remote debugging with IntelliJ
Whilst the main focus of this article is on remote deployment, it seems relevant to also describe the method of remote debugging, since resources on remote debugging are not always clear or easy to find, and since debugging is always nice to have in the development process, especially if you encounter problems with your application.
Remote debugging can be achieved by taking advantage of the JDWP (Java Debug Wire Protocol). Practically, this means setting some additional start up arguments. This is done by adding an additional CATALINA_OPTS or JAVA_OPTS to the Tomcat setenv.sh (.bat extension for Windows) file. This file can be found in the bin directory of your Tomcat installation.
For example adding:
export CATALINA_OPTS=”-Xdebug –Xrunjdwp:transport=dt_socket,server=y,suspend=n,address=9999″Will allow give us the ability to debug over port 9999. Generally, as a rule of thumb, avoid using JAVA_OPTS. Though it will usually work, it can often expose all Java applications to be debugged, which may not be a good idea from a security standpoint.
Then in your IDE there is usually some kind of remote option. In IntelliJ IDEA provided that the port has been set properly, you can add a new remote configuration with the following:
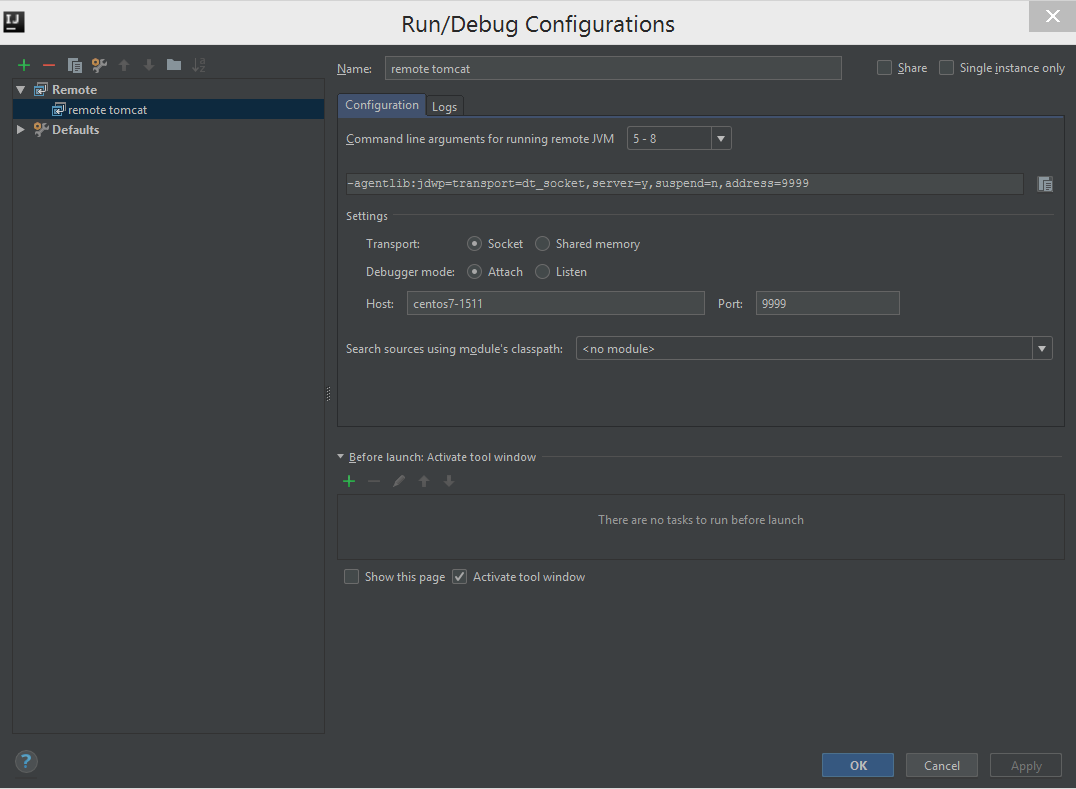
(Where “Host” has the FQDN/IP of the machine that you are using to deploy your application to.)
Once the application is deployed you can then set your break points and such, and you will then be able to remotely debug your application, using the IntelliJ debugger.
Summary
To deploy a WAR file to Tomcat this article has described approaches:
- Direct file transfer, which is suitable for one-off or infrequent deploys.
- Through the Tomcat Web Manager, which is useful if you can only access the web interface of a server.
- Using the Maven Tomcat plugin, which incorporates the deployment process within a Maven configuration.