Introduction
The Model-View-Presenter (MVP) pattern is a best-practice method of implementing Android applications and more specifically, for introducing separation of concerns into your Android application such that the user interface is decoupled from underlying application logic.
There are numerous explanations of the conceptual MVP pattern (and its counterpart Model-View-Controller or MVC) and we will not attempt to provide a beginners guide to MVP here. However, we have found most online resources that describe MVP, including those that focus on Android development, either gloss over the implementation details, or provide code examples which, in reality, do not illustrate effective use of MVP.
In this article we will outline a prescriptive, opinionated approach to MVP development on Android, including code-level implementation details and do’s-and-don’ts based on Priocept’s experience of building Android applications and cross-platform mobile apps in general.
MVP 101
If you are not familiar with the concepts of MVP, there are many other resources which you should probably study before continuing with this article, but to set the foundation, here is a 30-second overview of MVP. The “Model-View-Presenter” pattern defines three components of your application, as follows:
- Model – this component represents the domain model behind your application, which may include data sources, business logic, API calls, caching, and so on.
- View – this component is responsible for displaying information to the user. The view is also responsible for handling user interactions (such as clicking a button), and for delegating them to the Presenter.
- Presenter – this component sits between the Model and the View. It is responsible for implementing all core application logic, for interacting with the Model, for responding to user interactions within the View, and for manipulating the View to present information to the user.
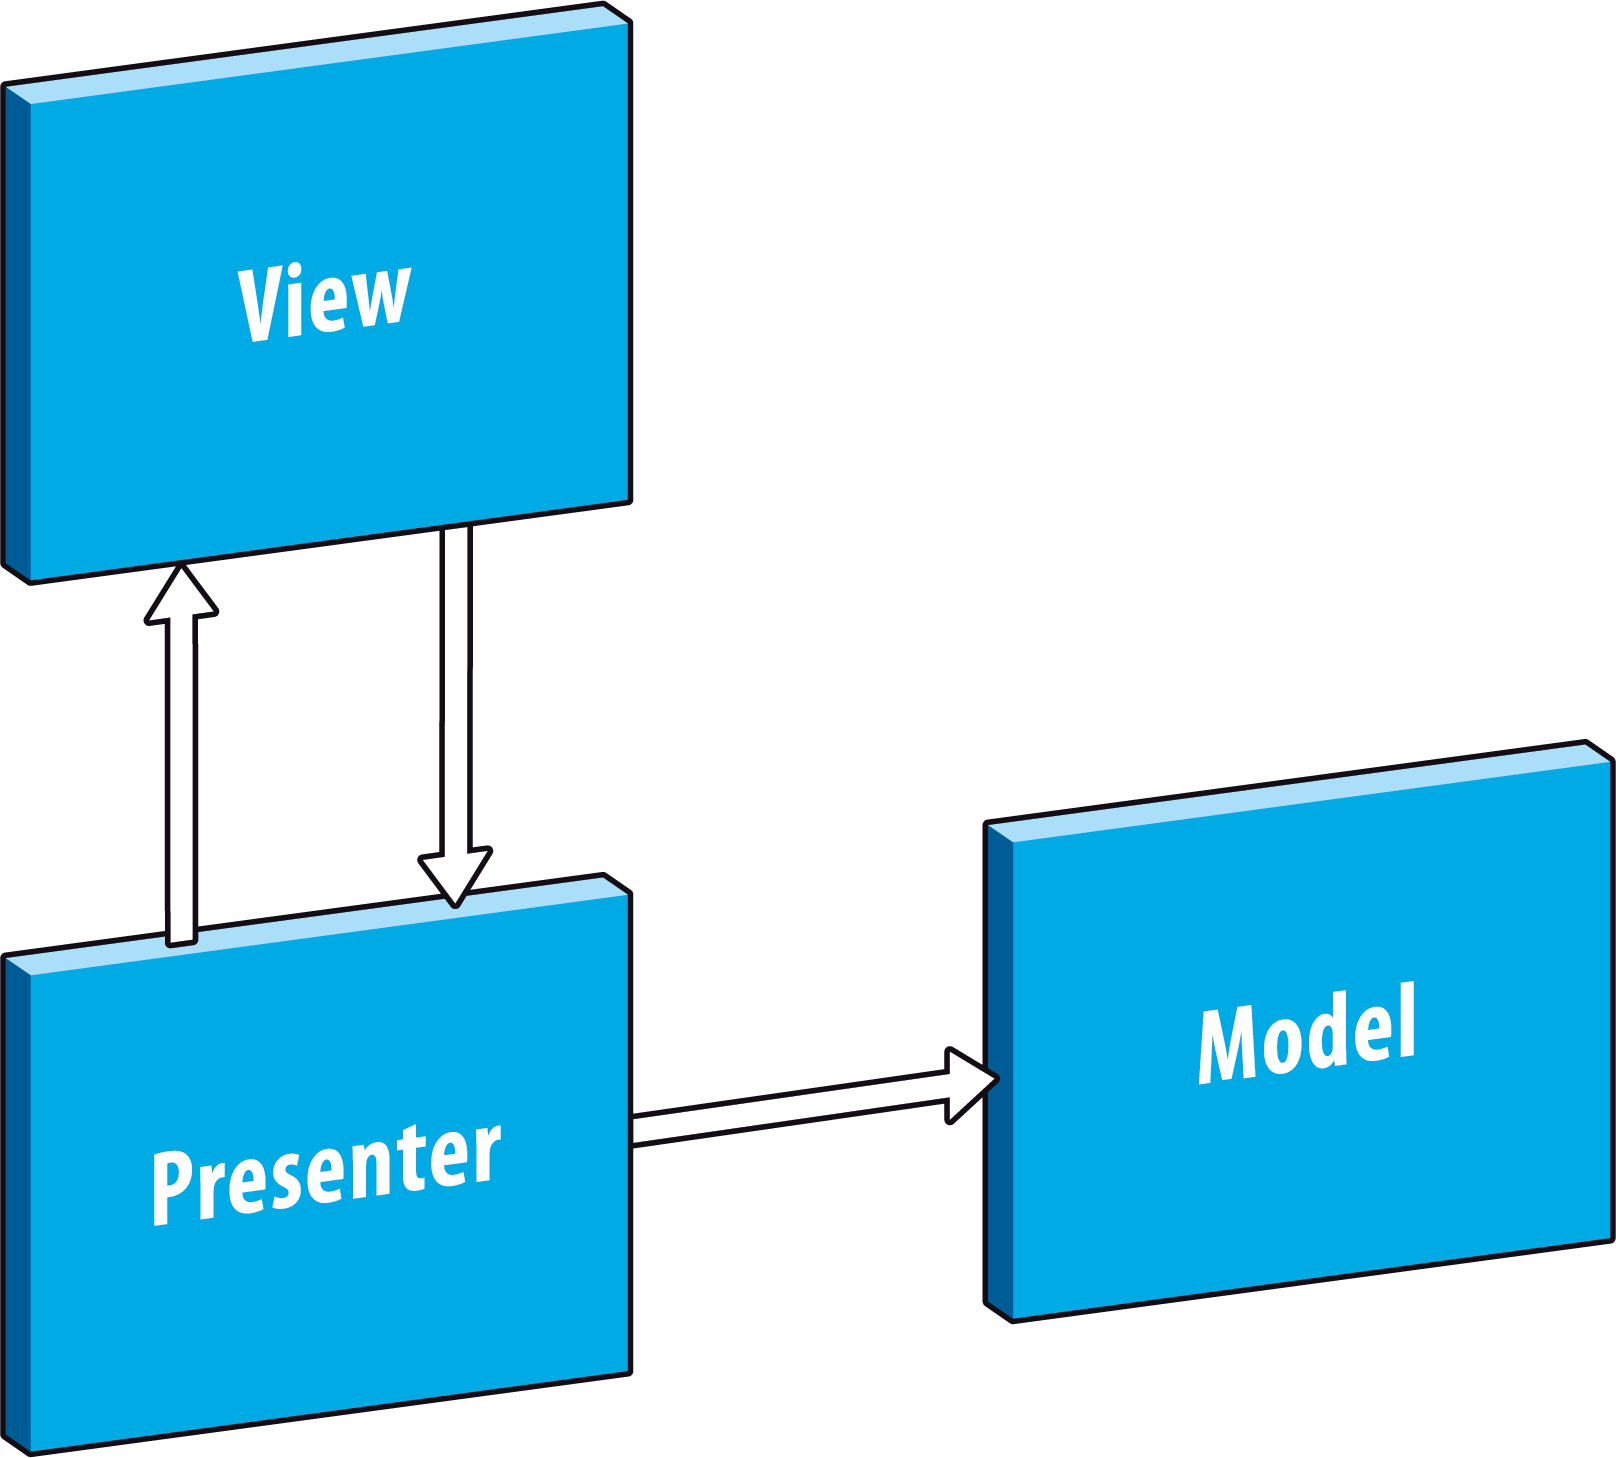
The pattern is illustrated below. Note the uni-directional arrow indicating that only the Presenter is aware of the Model, and that the Model is not aware of any other component. Note also the dual arrows between the View and the Presenter – the View is aware of the Presenter since it needs to be able to delegate interactions to the Presenter, and the Presenter is aware of the View since it needs to be able to present information to the user by controlling the View.
The MVP pattern can be further subdivided into Passive View and Supervising Controller implementations, described here:
The Passive View variant of MVP provides strict separation between components, with the View having zero knowledge of the Model, and being driven purely by the Presenter. The Supervising Controller variant is more akin to the MVC pattern, whereby the View is aware of the Model as well as the Presenter. We will explore this further below.
That’s the quick tour of MVP. Now let’s define how you should implement this in practice in Android. Remember that there is no “one way” for doing MVP on Android, but there are definitely good and not-so-good ways of implementing MVP on Android, so here we will describe the approach that Priocept has standardised on.
MVP Interface Usage
First let’s cover the use of interfaces in the MVP pattern, and let’s start with the MVP View in particular. All MVP implementations should define the View using an interface. This removes any tight coupling between the Presenter and the View, and allows alternative Views to be used with a single Presenter. This has a number of advantages:
- Portability. A single implementation of the Presenter can be reused across multiple differing view implementations for different platforms. This is important when writing cross-platform mobile applications, which we will elaborate on below.
- Better testability. The “real” View, which will rely on Android or other platform-specific frameworks, can be replaced with a mocked version, allowing testing of the Presenter without the need for an underlying Android framework.
- Explicit contracts. The interface defines the scope of all interactions between the Presenter and the View. This provides a useful level of design documentation within the code itself, by providing a single point of reference of all the behaviour that the View must support, to be useable by the Presenter.
Rule 1: Always define formal interfaces for your MVP Views, and implement Presenters that interact with these interfaces, not with concrete views. There shouldn’t be too much debate on this one.
There is little debate that an MVP View should be defined as an interface, with one or more implementations of this interface. But what about the Presenter? Do we need an interface for this? Do we need an extra level of abstraction, whereby any code that interacts with the Presenter does not know about a concrete Presenter implementation, but instead only knows about a Presenter interface? There are several arguments for not defining an interface for the Presenter. These are mostly valid and include the following:
- A Presenter interface is an extra level of unnecessary abstraction, making the code unnecessarily complex and verbose, and harder to navigate within your IDE.
- While there may be many alternative Views that implement a given interface, there will only ever be one Presenter. The Presenter contains the core user interface related logic for your application, so why would you ever need two different implementations of one app? And if there is only ever one implementation, why introduce the extra abstraction of an interface?
However, on balance, and despite these arguments, we have decided that all interactions with an MVP presenter should be via a formal interface. Why? Although an MVP Presenter interface adds slightly more code in the form of the interface definition plus injection of the implementation, the interface definition is very valuable in terms of documenting the entry points and behaviour of the Presenter. It provides a formal, single point of definition of all the events or interactions that the Presenter is expected to handle. This is a useful design tool and assists in development workflow by providing a “to-do list” of functionality that needs to be implemented in the Presenter.
Rule 2: Define formal interfaces for your MVP Presenters as well as your MVP Views. There is plenty of debate on this one, but overall, we think this approach introduces very little overhead, for significant benefit.
We haven’t mentioned the Model yet. Should there also be a formal interface definition for the Model? Our answer is “in general, no”. If for some reason your Presenter needs to be executed against multiple alternative Models, then you will need this interface. But in most cases, we would argue that there should only be one Model that is exposed to the Presenter. This Model may, internally, use dependency injection or similar techniques to use support multiple implementations. For example, the Model may need to persist data via an API, or to local SQL database, or to a mocked repository that is used only during testing. But this level of abstraction is a concern of the Model itself, not a concern of the Presenter that it calling the Model. On this basis, it is generally sufficient for the Presenter to interact with a concrete model. Note, however, that this argument assumes that you have implemented your Model correctly – see below for further details.
Rule 3: Let your Presenter implementation interact directly with a concrete Model, without defining a Model interface, unless you have very good reason to support multiple alternative Models.
Interface Naming and Structure
Many introductory guides to MVP will show examples such as these interface definitions:
interface ExampleView {
    void enableRefreshButton();
    void disableRefreshButton();
    void showItemDescription(String description);
}

interface ExamplePresenter {
    void refresh();
    void deleteItem(String itemId);
}
followed by these implementations:
class ExampleViewImpl implements ExampleView {

    @Override
    public void enableRefreshButton() {
        //...
    }

    //...

}

class ExamplePresenterImpl implements ExamplePresenter {

    @Override
    public void refresh() {
        //...
    }

    @Override
    public void deleteItem(String itemId) {
        //...
    }

}
Or, even worse, the interfaces are prefixed with a capital “I” so that the “Impl” suffix can be dropped. interface ExamplePresenter becomes interface IExamplePresenter and then class ExamplePresenterImpl becomes class ExamplePresenter.
Don’t do this either of these things!
Instead, we can use a nested interface definition, allowing us to use clearly named interfaces and classes, without conflict between them. This gives us:
interface ExampleMvp {

    interface ExampleView {
        void enableRefreshButton();
        void disableRefreshButton();
        void showItemDescription(String description);
    }

    interface ExamplePresenter {
        void refresh();
        void deleteItem(String itemId);
    }

}

class ExampleView implements ExampleMvp.ExampleView {

    @Override
    public void enableRefreshButton() {
        //...
    }

    //...

}

class ExamplePresenter implements ExampleMvp.ExamplePresenter {

    @Override
    public void refresh() {
        //...
    }

    @Override
    public void deleteItem(String itemId) {
        //...
    }

}
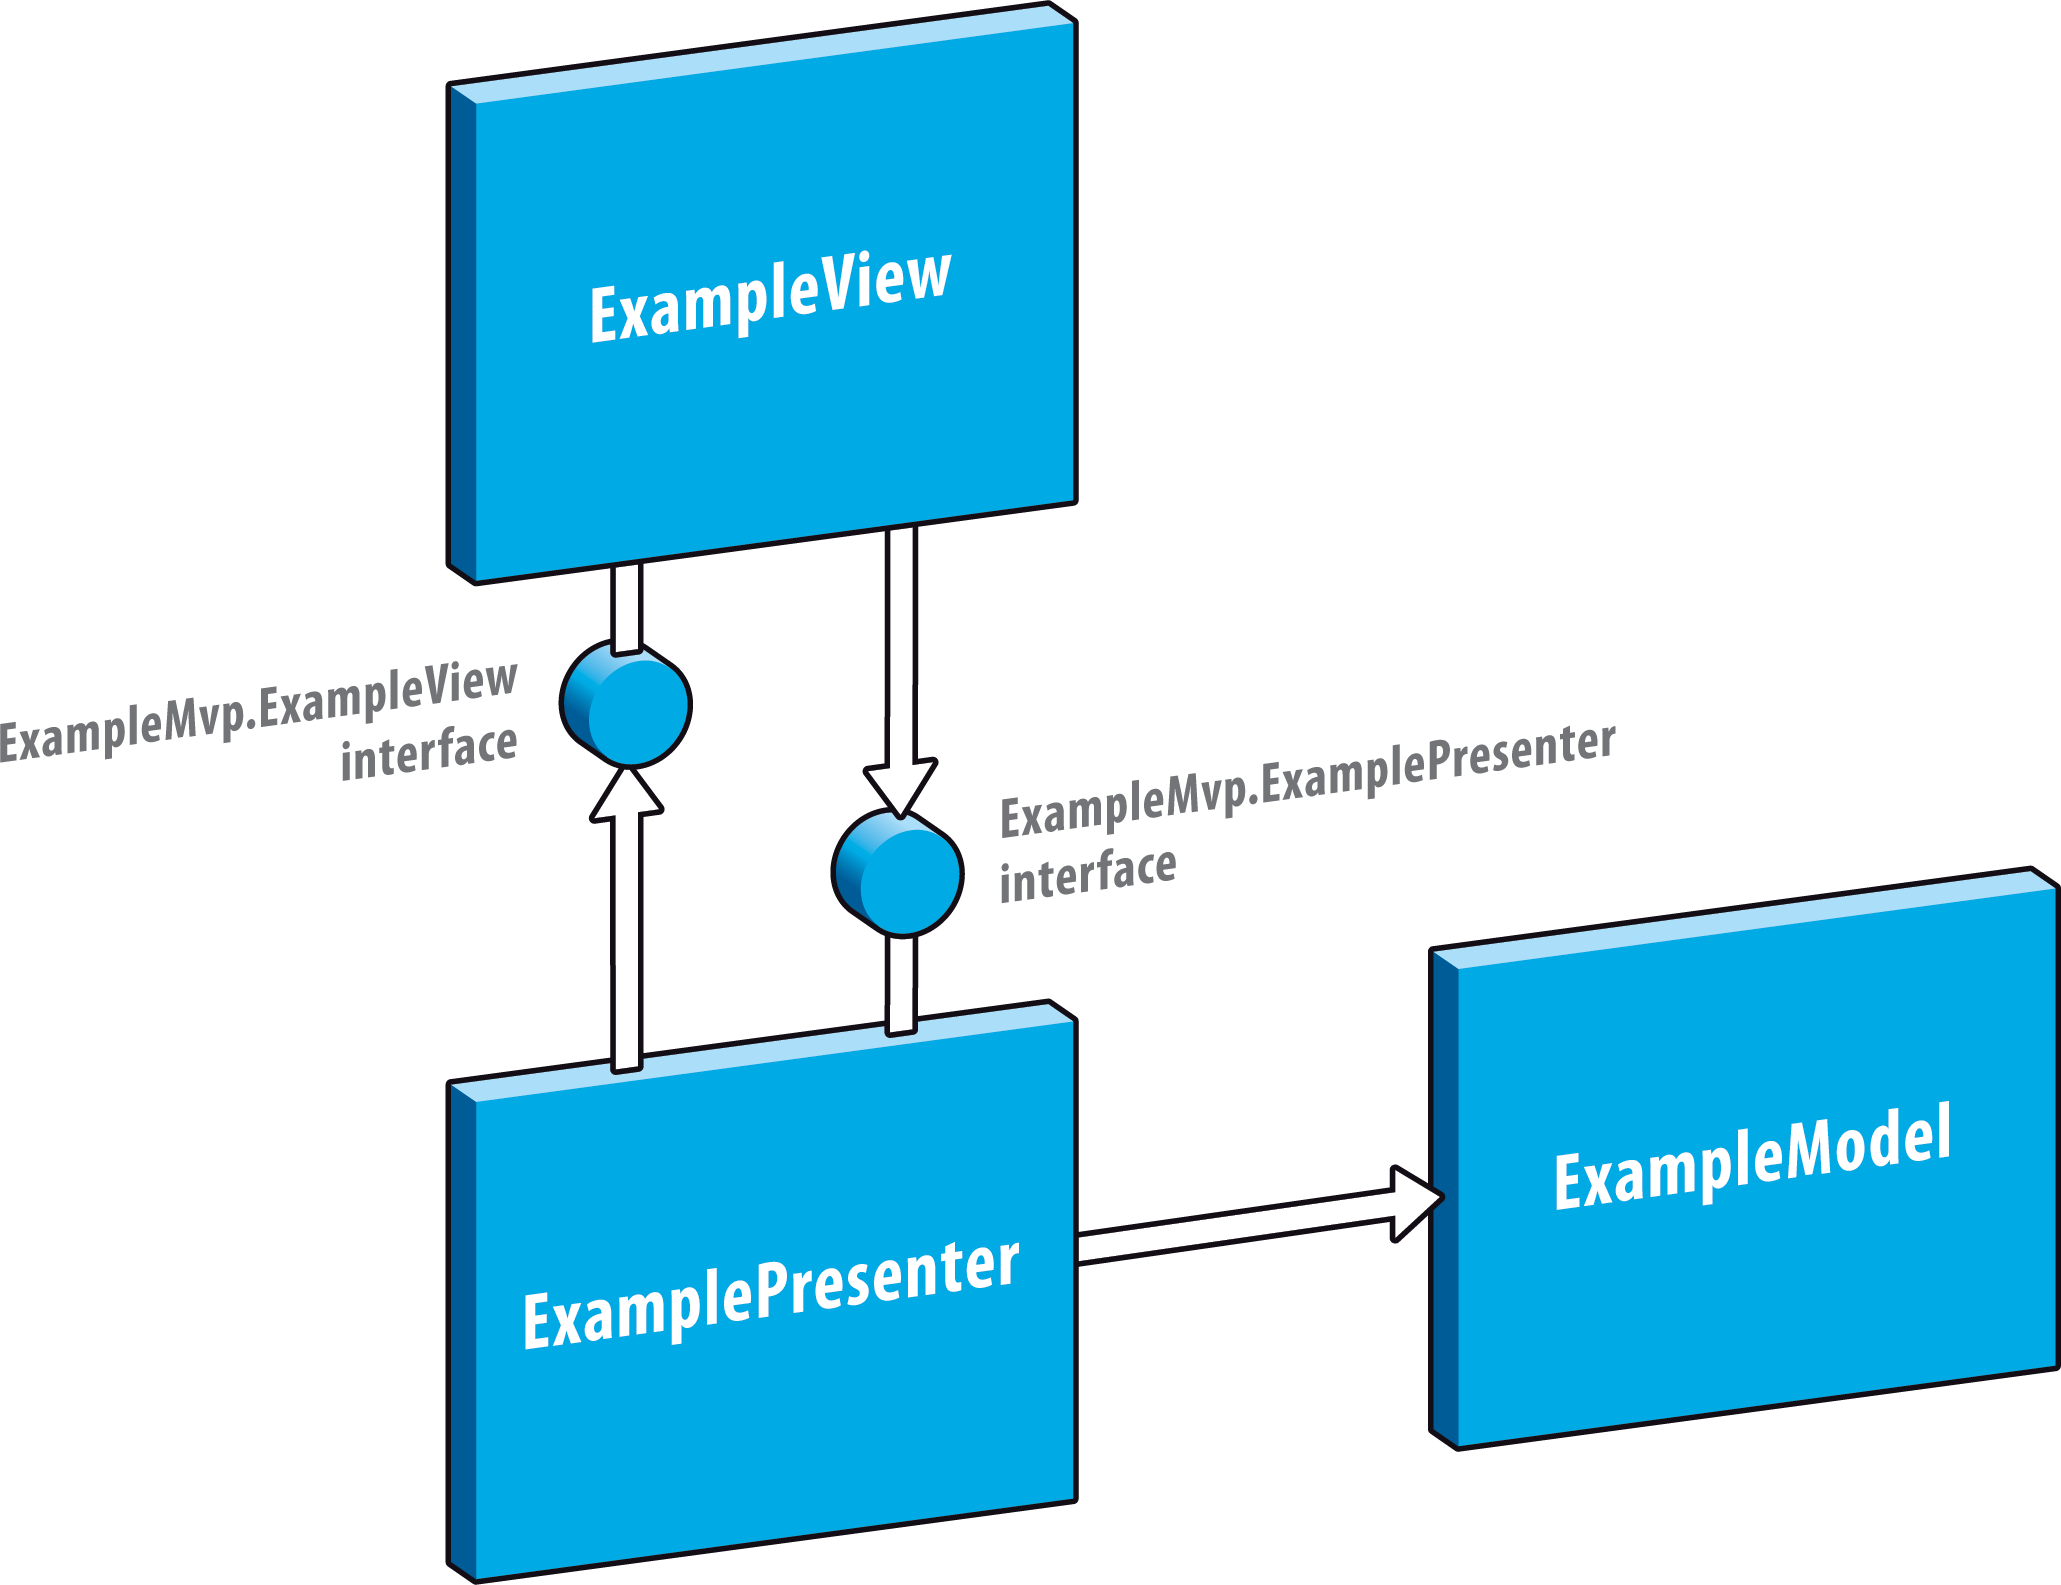
Now we have sensible names for both the interfaces and the classes. The hierarchical interface structure also allows us to have one file which defines all the interfaces and acts as a single point of reference for the contracts between each MVP component. Note that by convention, we name all our top-level containing interfaces with the Mvp suffix, so that it is obvious that a given interface relates to an MVP implementation.
Rule 4: Wrap your MVP View and MVP Presenters interface definitions inside a single “container” interface. Name this container such that it is obvious that it relates to an MVP implementation. If you need to use an interface for your MVP Model, define this interface here too.
Our diagram above, with the interfaces illustrated and the naming convention example above applied, now looks like this:
Implementing the MVP View on Android
The closest thing to an MVP View on Android is either an android.app.Activity, android.app.Fragment or android.view.View object. These are the three main types of Android construct that are used to build a user interface in an Android application, so it is natural to view these as the MVP View. For the remainder of the content below we will use android.app.Activity in our examples, but fragments and (Android) views apply in exactly the same way.
So, the logical first step to implementing your MVP View in Android is something like this:
class ExampleActivity implements ExampleMvp.ExampleView {

    private ExampleMvp.ExamplePresenter mPresenter;

    public ExampleActivity() {
        // create the presenter, passing in a reference to the
        // view (this activity) which it should interact with
        mPresenter = new ExamplePresenter(this);
    }

    // activity lifecycle methods
    @Override
    public void onCreate(Bundle savedInstanceState) {
        //...
    }

    @Override
    public void onResume() {
        //...
    }

    // view implementation methods
    @Override
    public void enableRefreshButton() {
        getRefreshButton().setEnabled(true);
    }

    //...

}
The Android Activity class directly implements the MVP View interface. And indeed this is the implementation style that you will see in the vast majority of Android MVP examples and tutorials.
Don’t do this!
Why not? Well, here we have an Android activity which although it is a trivial example, is already performing two different tasks. It is both managing the Android activity lifecycle (onCreate(), onResume(), onPause() and so on), AND it is also implementing our MVP View. This is violating the single responsibility principle, but it also leads to unnecessarily large Activity classes, and it leaves a messy combination of Android lifecycle management code, and user interface (MVP View) implementation all in one place. We want to keep these two things separate, both to make the code easier to read and more manageable, but also to allow someone who may need to make changes to the user interface to do so without having to wade through and potentially break a bunch of Android lifecycle code that really should not be their concern.
Rule 5: Do not implement your MVP View directly within an Android Activity, Fragment or View.
So, how do we achieve this in practice? So far we have implemented two classes, the MVP Presenter, and the Android Activity. Rather than making the Activity implement the MVP View directly, we introduce a third class which has the sole job of providing an Android-specific implementation of the MVP View. It will only contain code that is directly necessary for implementing the view, and nothing else. By convention, we can suffix this class with MvpView, to distinguish it from android.view.View objects. The corresponding Activity (or Fragment or Android View) will need to be injected into the MVP View object on its creation, as the view will need a reference to the Activity to do its job.
Now we have:
// activity no longer implements the MVP view
class ExampleActivity {

    private ExampleMvp.ExamplePresenter mPresenter;

    public ExampleActivity() {
        // create the presenter, passing in a reference
        // to a dedicated ExampleMvpView object, rather than
        // the activity directly
        mPresenter = new ExamplePresenter(new ExampleMvpView(this);
    }

    // activity lifecycle methods
    @Override
    public void onCreate(Bundle savedInstanceState) {
        //...
    }

    @Override
    public void onResume() {
        //...
    }

    // no view implemention methods in this class
    // now, just Android Activity specific code...

}
and then:
// new class which provides the Android implementation of the MVP View
class ExampleMvpView implements ExampleMvp.ExampleView {

    private Activity mActivity;

    public ExampleMvpView (Activity activity) {
        // store reference to the activity, needed
        // by the MVP View implementation methods below
        mActivity = activity;
    }

    // this class should implement only the methods
    // required by the ExampleMvp.ExampleView interface
    // plus any internal (private) helper methods, nothing else

    @Override
    public void enableRefreshButton() {
        mActivity.getRefreshButton().setEnabled(true);
    }

    @Override
    public void disableRefreshButton() {
        mActivity.getRefreshButton().setEnabled(false);
    }

    //...

}
With this approach, all your Android UI implementation code can live in the ExampleMvpView class. Meanwhile, all your Activity lifecycle code, which often does not need to be the concern of another team member that is working on the core UI, lives in a separate Activity class.
Our MVP diagram, updated again to reflect this Android-specific pattern, is shown below. Suddenly it looks quite complex, but in practice provides much better separation of concerns than the earlier, more simplistic pattern. Note that the Android Activity is aware of the concrete implementations of both the Presenter and the Android MVP View, since it needs to instantiate both of them when “wiring up” the components. And the Android MVP View is aware of the Activity, since it needs to be able to delegate certain tasks to the Activity, such as retrieval of specific UI elements by ID.
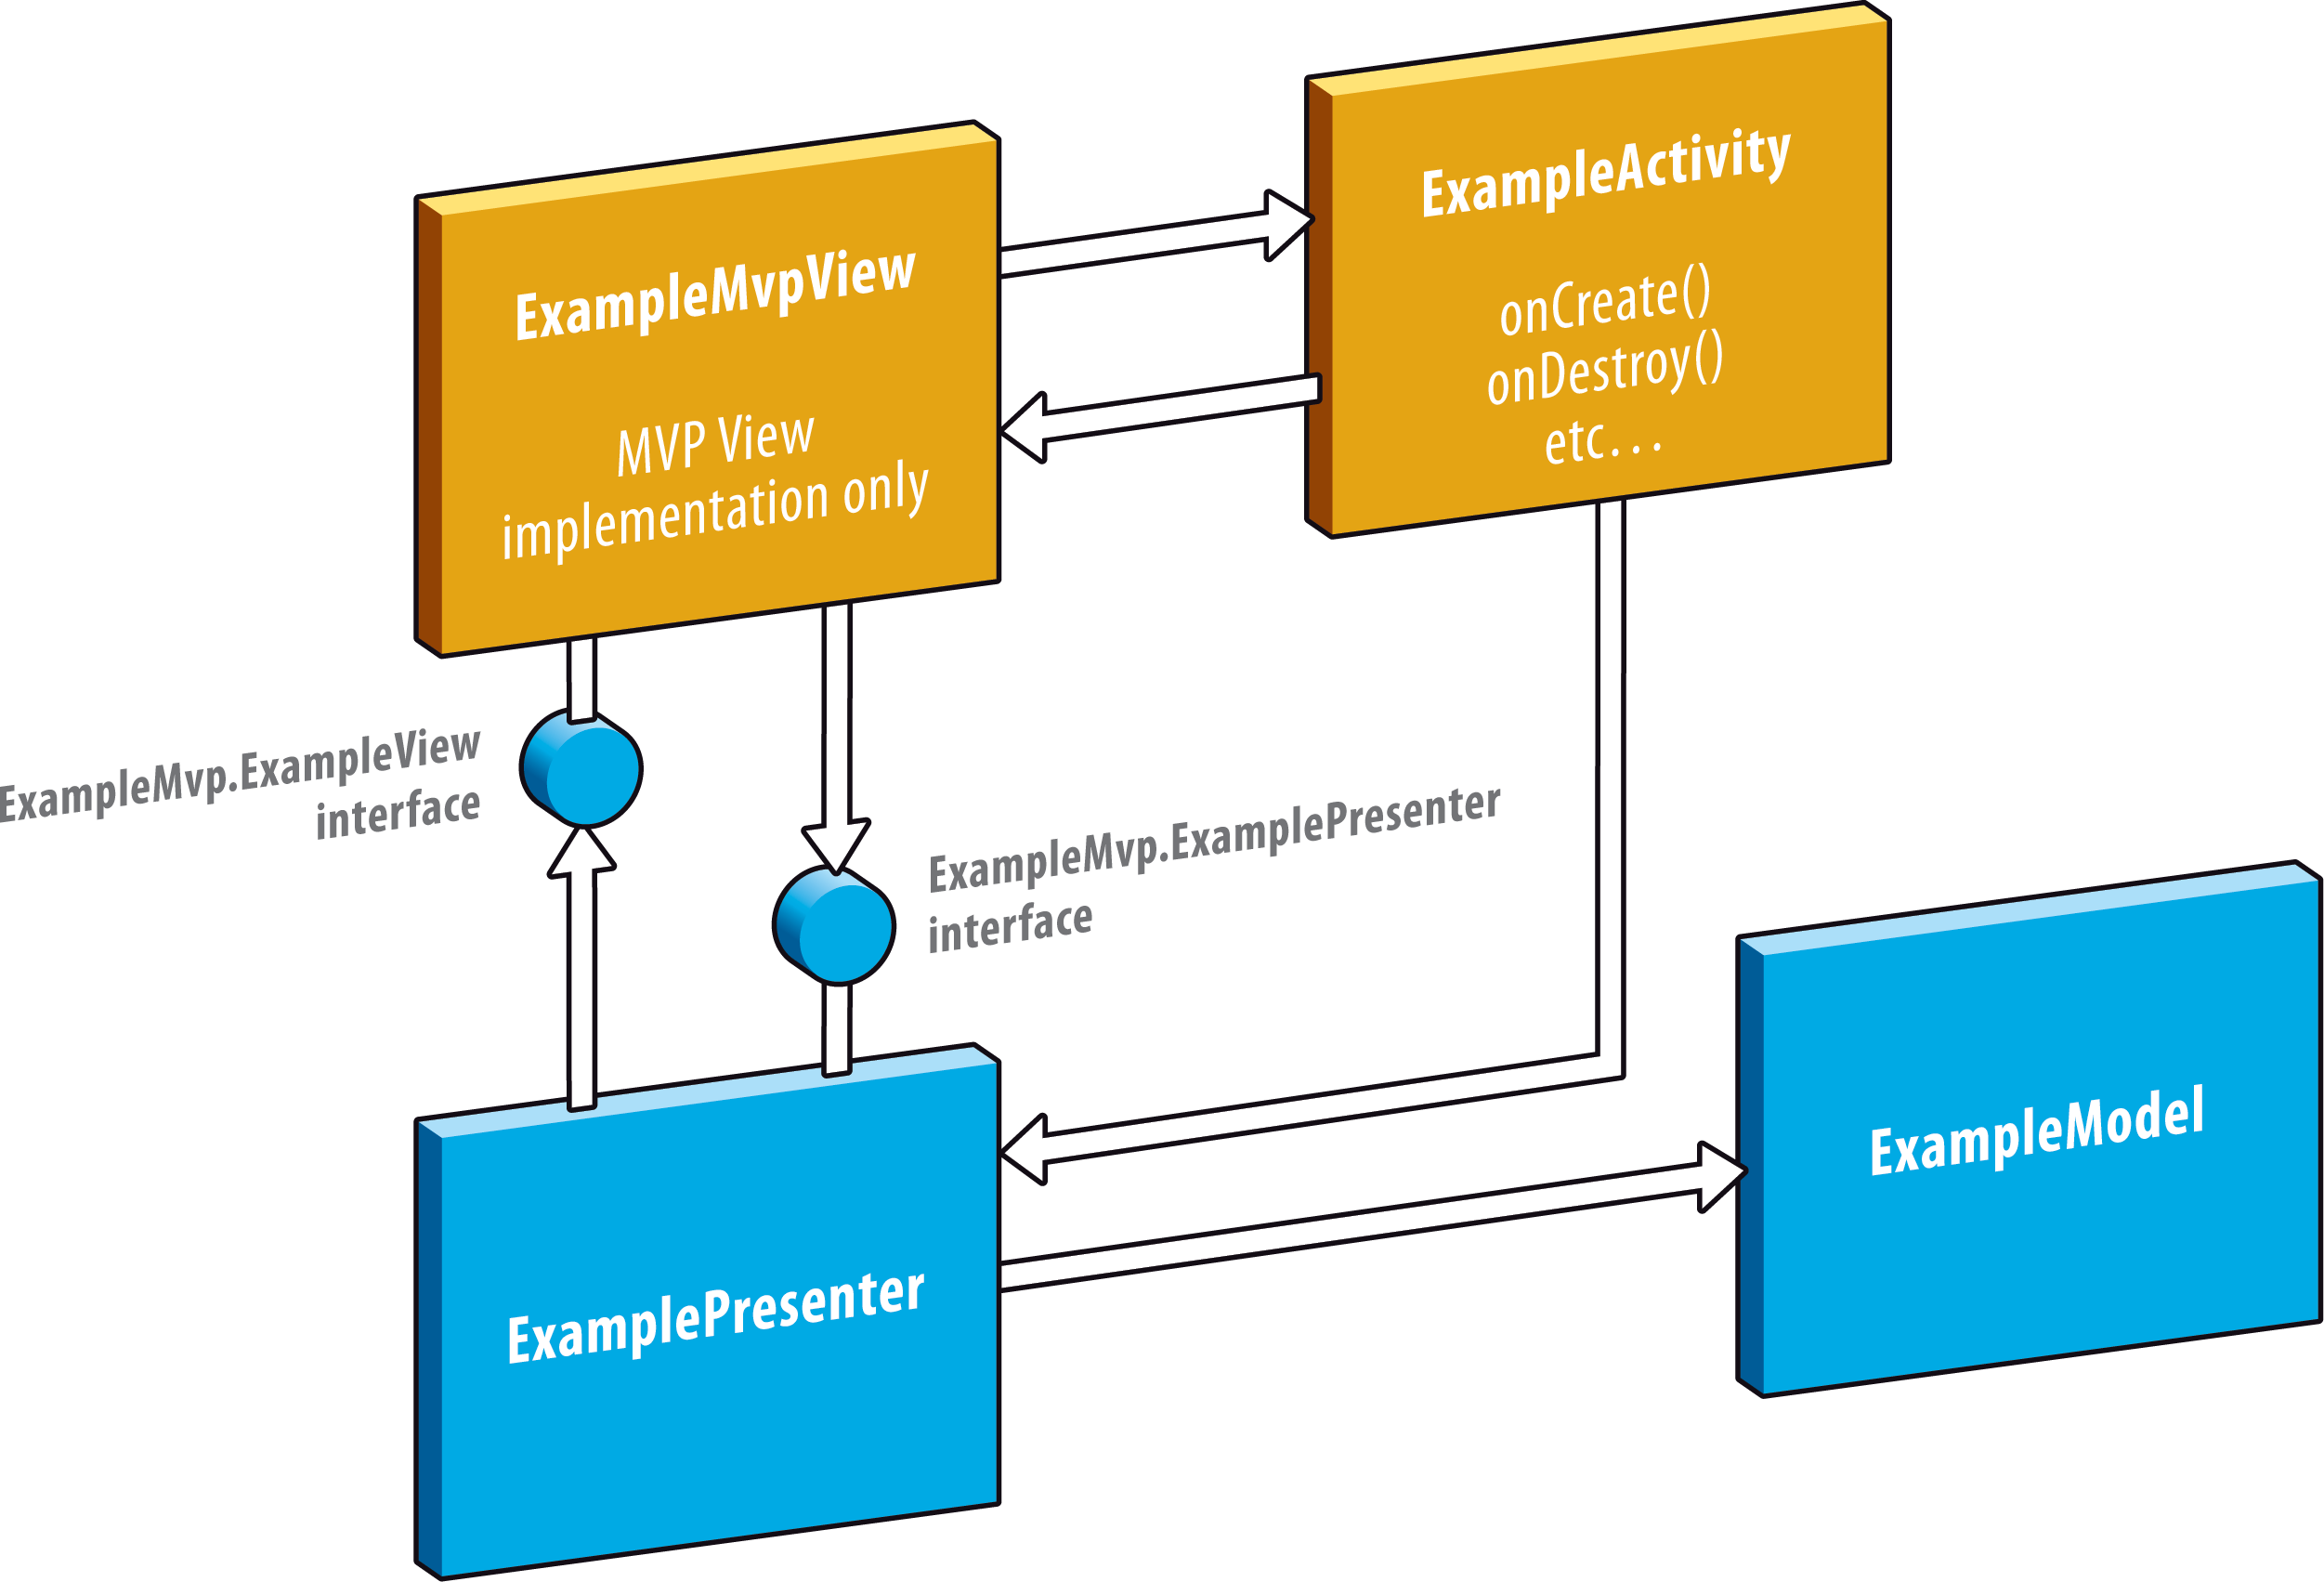
Note also that if you decide that you need to refactor an existing Activity as a Fragment, or a View, or vice versa, the MVP View class will not need significant changes. It will need to take a reference to a Fragment instead of an Activity, but assuming the new Fragment implements the same getter methods as the Activity did previously, the MVP View code will continue to work without further changes. The MVP View class is isolated from much of the Android-level implementation detail, and concerns itself only with getting references to UI elements that it needs to control or display information into.
Implementing the MVP Presenter
The job of the presenter is to implement all the user interface logic (user-facing functionality). There is no reason why this logic should depend on the implementation details of Android.
Rule 6: The Presenter should be cross-platform code, and know nothing about Android.
Unfortunately, many Android MVP code examples will show the Presenter implementing Android-specific user interface logic, or interactions with the Model, in a way that requires knowledge of the Android framework. A common example is a Presenter that needs to check user preferences that enable or disable some behaviour. If the Presenter makes calls directly to PreferenceManager.getDefaultSharedPreferences() then it is going to need an Android context object, and now you are going to need to pass this context into the Presenter when you create it. Now you have a Presenter implementation which cannot be executed or tested without an Android context, and cannot be reused on non-Android platforms.
The second point above is very important if you ever plan to port your mobile application to a platform other than Android. Perhaps you plan to use J2ObjC to reuse your Android-originated Java code within an iOS version of the application. Or perhaps you plan to build a “mobile web” version of the application that uses HTML/CSS/JavaScript to implement a second MVP View alternative to your existing Android Activity. If you go down this route, then you want your presenters to have zero direct dependencies on the Android SDK, so that you can reuse these “pure Java” presenters, completely unaltered, on other platforms.
To achieve this, you will need to use dependency injection to provide your Presenter (and/or the underlying Model) with all the Android-specific implementations that are required for it to function – this commonly includes SQLite database functionality, user preferences retrieval, networking, JSON/XML parsers, etc.
The best way to enforce this rule, and to ensure that no Android-specific code “leaks” into the parts of your MVP implementation that should be cross-platform, is to move your presenters and MVP interface definitions into a generic Java module, which does not import any Android dependencies. If you are using Android Studio, you can do this by creating a “Java Library” module in your project, that is separate from your main Android module, as illustrated below.
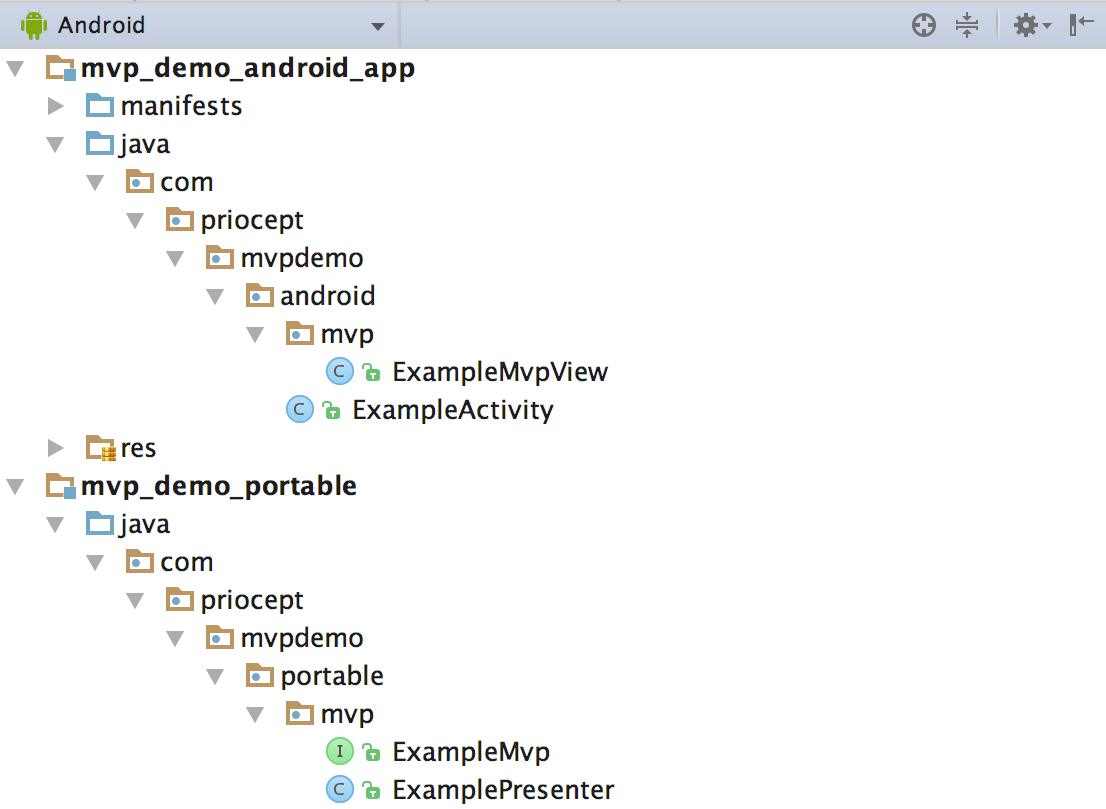
The first module mvp_demo_android_app contains all Android-specific code, and the Gradle build file will contain appropriate Android SDK references, but the second module mvp_demo_portable is a pure Java library, with no Android references. This module will contain the core MVP interface definitions (shown above as the ExampleMvp interface), plus the Presenter implementation. By hosting the MVP interfaces and Presenter implementation in a pure Java library module, you will prevent accidental leaking of Android-specific code into your Presenter. This will ensure that your Presenter code always remains 100% portable to other platforms. Even if you only ever plan to build an Android version of your application, this approach still has the advantage of enforcing a clean MVP architecture, where the Presenter has knowledge only of the generic View interface, and a generic Model implementation, and does not need to concern itself with Android-specific details, which should not be the role of the Presenter.
Where it is impossible for your Presenter to perform all its work without reference to the Android SDK, you have the choice of injecting the required Android SDK implementation into the Presenter, or making your portable Presenter an abstract class, and then creating a sub-class of the Presenter, in your Android module, that implements only the Android specific functionality. One example may be where your Presenter implements a new screen (say a second activity on Android), and on completion it needs to return a value entered on that screen, back to the first screen. On Android this would typically be performed using Activity.setResult() to allow exchange of data from a second Activity back to the first Activity. You can either inject this implementation detail into your portable Presenter, or you can define an abstract method such as:
abstract public void setReturnData(String returnData);
within your portable Presenter, and then override it in the Android-specific Presenter, which should only implement this method, with all core Presenter logic remaining in the portable Presenter.
By extension of the above, your Presenter should also have no knowledge of the details of Activity lifecycles or other Android-specific concepts. It should also not have any concept of user interaction types that may be specific to the Android platform.
Rule 7: MVP Presenters should only implement generic events or user actions, not Android-specific lifecycle concepts, nor specific forms of user interaction that may relate only to the Android platform.
For example, in the following Activity we are delegating some setup tasks to the Presenter during the onCreate() lifecycle event, and we are also delegating a button click event to the Presenter:
class ExampleActivity {

    private ExampleMvp.ExamplePresenter mPresenter;

    public ExampleActivity() {
        mPresenter = new ExamplePresenter(new ExampleMvpView(this);
    }

    // activity lifecycle methods
    @Override
    public void onCreate(Bundle savedInstanceState) {

        // set content view etc...

        // delegate button click handling to the presenter
        getDeleteButton().setOnClickListener(new View.OnClickListener() {
            public void onClick(View v) {
                mPresenter.onDeleteClick();
            }
        });

        // delegate the rest to the presenter
        mPresenter.onCreate();

    }

}
The Presenter interface would look like this:
interface ExamplePresenter {

    void onCreate(String info);
    void onDeleteClick();

}
There isn’t too much wrong with this implementation, except the detail of the Presenter method naming. Firstly, the onCreate() method in the Presenter is mapped very closely to the underlying Activity lifecycle. If you end up with a Presenter that has methods such as onCreate(), onResume(), onPause() etc. then the design of your Presenter is too tightly coupled to Android-specific concepts. Equally, the onDeleteClick() method in the Presenter implies that the delete action will always be performed by clicking a button. This may not be case on a different platform. Perhaps on iOS the delete will be performed using a swipe interaction rather than a click. Hence your Presenter methods should be named to reflect the logical actions that it will handle, not the specific interactions that might be used on a specific platform. The Presenter interface then becomes:
interface ExamplePresenter {

    void init();
    void onDelete();

}
You will most likely need some lightweight “presenter lifecycle” methods in most of your Presenters. These can normally be standardised across all your presenters. For example, you can use init() for initialization and setup tasks that only happen once but do not cause any view changes, followed by start() if you need to trigger Presenter behaviour such as polling data and updating the View, then corresponding stop() and terminate() methods if required. But you should not be creating a one-to-one mapping from Android Activity/Fragment/View lifecycle events to Presenter events.
These kinds of considerations are another argument for defining an interface for the Presenter. It provides a central, concise definition of all the interactions with the Presenter, allowing quick review (or refactoring) of any Presenter methods that are poorly thought out.
Method Naming
Using a consistent naming convention for the methods of your View and Presenter can make your MVP code far easier to understand. Here are some suggested conventions:
- Prefix Presenter actions (events) which the View delegates to, with “on”, for example onRefresh(), onDelete(), etc.
- Use standardised Presenter method names for common “control” methods that do not relate to delegation of events from the View, for example init(), terminate(), etc.
- Standardise on verb prefixes for MVP View methods, for example showDescription(), hideDescription(), enableRefreshButton(), disableRefreshButton() etc.
- Use standard getter style methods where you need to retrieve current state from the MVP View, for example getNewPassword().
Other Considerations
Stateful vs Stateless Presenters
MVP Presenters may be stateful or stateless. In practice, most non-trivial Presenters will need to maintain their own state to track what is going on and ensure the correct behaviour at the correct time. This state could potentially be moved to the View, but it is not the job of the View to maintain state in support of the Presenter. The View should only retain state to the extent that there is state (information) being displayed to the user at a given point in time.
Where your Presenter has state, you will need to restore this state in the event that the MVP View is destroyed and recreated during the lifetime of your application. This is particularly a problem on Android where Activities and Fragments are subject to termination at any time, and most notably when there is a screen orientation change.
You can address this problem by saving Presenter state to a Bundle using onSavedInstance() state. Provided that you have a model class that represents the state that you need to restore, and provided that this class implements the java.io.Serializable interface, then you can simply use the putSerializable() and getSerializable() methods of the instance state android.os.Bundle object, along the following lines:
@Override
    public void onSaveInstanceState(Bundle savedInstanceState);
    savedInstanceState.putSerializable(STATE_PRESENTER_KEY, mPresenterState);
}

@Override
protected void onCreate(Bundle savedInstanceState) {

    super.onCreate(savedInstanceState);

    // restore previous status data if available
    if(savedInstanceState != null) {
        mPresenterState =
            (PresenterState)savedInstanceState.getSerializable(STATE_PRESENTER_KEY);
    }

}
An alternative is to persist presenters beyond the lifecycle of an Activity or Fragment, by saving them at the application level. But the Presenter exists only to drive the Activity or Fragment (MVP View), not to persist data. And persisting a Presenter beyond the lifetime of an Activity creates the need to implement code that re-attaches an existing presenter to a new instance of an Activity. For these reasons it is cleaner to terminate the Presenters when the MVP View itself is terminated. The main exception to this rule is when you have a long-running task, such as a network request, that needs to continue even if the Activity is destroyed. But is most cases this can be dealt with more effectively by using a background service.
There is an argument that Presenters should always be stateless and that all state should exist in the view, but this can pollute the view with state that it should not need to be concerned with.
Data-Binding
It is common to use data binding in an Android application. A simple example is the use of a ListView combined with a CursorAdapter, to render information from a SQLite database within a list view.
In this model, the Supervising Controller version of MVP is in use, rather than the Passive View. We are delegating presentation logic to our ListView and CursorAdapter and now have a Model (the database and cursor) that is directly interacting with the View. Our Presenter may be “supervising” or initiating this data-binding, but it is not implementing or fully controlling it.
One approach to preventing large amounts of UI code growing within your data binding implementation, is to have the bindView() method of your CursorAdapter implementation delegate to a second “nested” Presenter. Now you have one parent Presenter that initiates the data binding, and then a second Presenter, of which one instance is created for each record returned by the cursor. For example:
private class ExampleCursorAdapter extends CursorAdapter {

    @Override
    public void bindView(View view, Context context, Cursor cursor) {

        // delegate to MVP presenter
        ExampleRecordMvp.Presenter recordPresenter =
            new RecordPresenter(new ExampleMvpView(view));
        recordPresenter.showInformation(cursor.getString(0));

    }

}
The approach minimises the use of the Supervising Controller pattern, and maximises the use of fully portable Presenters and passive MVP Views. Any complex user interface logic that is required to map database-level data to a specific method of display to the user, can be captured within a portable Presenter, rather than within the Android-specific code base.
Conclusion
Careful structuring of interfaces and in particular the use of an interface for Presenters can lead to easier to understand and self-documenting MVP implementations. The purpose of Activities, Fragments and Views within an Android code base is to implement your application’s interaction with the Android operating system. Limit them solely to this purpose and separate your Android level MVP View implementation into different classes. And finally, implement your Presenters so that they are completely portable, both in the sense that they should not contain any direct dependencies on Android API’s, and in the sense that they should not be tied to Android-specific design or user interaction concepts.
In part two of this article we will cover some further Android MVP related subjects including techniques for avoiding large Activity or Presenter “god objects”, and how to create a highly portable MVP code base that you can reuse across Android, iOS, and other platforms.
Nice and complete guide. One question, if I understand correctly you suggest that Views and Presenters should be destroyed. If a presenter asked a DownloadManager to start a long download and waits until is finished to make it’s callback and we kill the View (and the Presenter) then we should check if the instance of the callback(probably a listener interface) is null? Personally when attach my Presenters to Fragments I let the activity keep a reference to the Presenter and reattach it when the view is recreated or if it is an Activity Presenter I leave my Application class do the handles.